Showing posts with label Gifts. Show all posts

Wednesday, October 23, 2019

I Trusted in Thee

It's time for another challenge at Word Art Wednesday. This week we're focusing on Psalm 31:14, "But I trusted in thee O Lord: I said, Thou art my God."  There are times in our lives that make us evaluate if we truly believe God is trustworthy. In this week's verse, the Psalmist has just made his evaluation and decision. Earlier this week, I was recounting to a friend of a time when I was in a deep valley and that I had to decide if what I said I believed about God and His comfort and strength was really true. I had to face that I could NOT go it alone in my own strength and that there was no earthly person who could fix things. I had to rely on the Lord and fully rest on Him. It was not easy or an overnight fix. I found a verse of comfort in the Bible that really spoke to me and imagined it as a trapeze bar that I was literally hanging onto with both hands. I felt like everything had dropped out from underneath me and that bar was all that was keeping me from falling. I would read, quote and pray that verse to the Lord and beg Him for His help. I acknowledged I couldn’t do it alone and needed His help. He was always faithful and kept me putting one foot in front of the other sometimes minute by minute. I agree with the Psalmist, "...I trusted in thee O Lord: I said, Thou art my God."


I chose to use this week's free WORDart (don't forget to go by the Word Art Wednesday blog and pick it up for yourself) on a book mark. I made the bookmark part of a gift set for a friend.


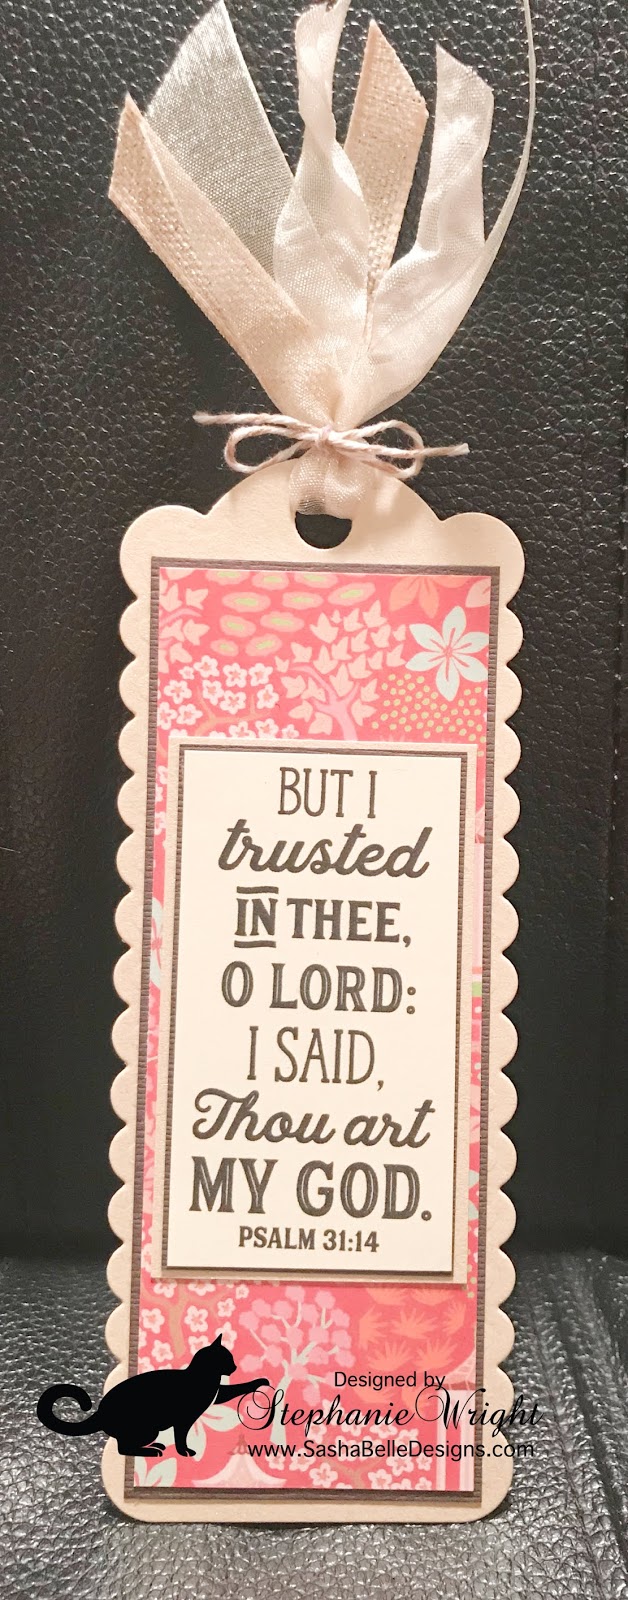
The verse was double matted before being adhered to the patterned paper layer. Three ribbons were threaded through the hole at the top of the bookmark and some baker's twine was tied in a bow to keep them in place.


A small notebook (3.75" x 5.5" closed) was decorated with a heat embossed quote by Jim Elliot and a few jewels. I tend to keep the covers of my notebooks fairly flat so that the embellishments don't get knocked off if the notebook is put down in a bag or purse.


The interior of the notebook has a small notepad on the right side. The back panel of the notepad slides down into a pocket so that it is replaceable. The left side of the interior has a large pocket and two small sticky-note pads.


One of my standard 5.25" x 8.25" junior legal size notebooks has a favorite quote by Corrie ten Boom heat embossed and then matted with dark brown cardstock. I thought this quote and the Jim Elliot quote went well with the focus verse this week. A few jewels decorate the flower centers.


The interior of the notebook has a pocket to hold the notepad on the right and another pocket on the left for odds and ends.


The thank you card uses MOJO Monday Sketch 524 for the design. The background panel was dry embossed and the sentiment heat embossed. A few clear jewels are the final embellishment.


There is a little interior decorating for the inside of the card.

Supplies: 
Cardstock (all items unless otherwise noted): Core'dinations (Tan Pearl), Bazzill (dark brown), Recollections (cream on card interior and bookmark), Park Lane (Neutrals - card interior)
Patterned Paper (all items): Basic Grey (Dear Heart Collection - Grace)
Stamps (as noted): WORDart by Karen (Psalm 31:14 - bookmark), Simon Says Stamp (Many Thanks clear stamp set - card), Divinity Design (Quote Collection 4 - small notebook, Never Be Afraid - large notebook)
Dies: Divinity Design (Bookmarks-bookmark, Double Stitched Circles- card and small notebook) Spellbinders (Petite Scalloped Circles Large - card and small notebook), My Favorite Things Die-namics (Mini Scallop Edge - retired - card)
Embellishments: Eyelet Outlet Multi Jewels Clear (both notebooks, card), The Ribbon Boutique (organza-bookmark), Big Lots Craft Ribbon (bookmark), May Arts Seam Binding (bookmark), Ms. Sparkle baker's twine (bookmark)
Other: Darice embossing folder (Cherry Blossom - card), Versafine Onyx Black Ink (card, both notebooks), Simon Says Stamp fine details embossing powder (Clear - card, both notebooks)

I'm entering items from this set in the following challenges:
Artsystamper  Digitals Challenge #2 - Patterned Paper

A Place to Start - Use at least 1 item from each column (Focusing on my card: Column 1- sentiment, patterned paper, solid paper; Column 2 - sketch, die, embossing -I used both; Column 3 - embossing powder; Column 4 - bling, flowers; Column 5 - stitching-faux)

Through the Craftroom Door - Anything Goes

Thanks for visiting with me today. I hope you'll come back soon.

Thursday, December 20, 2018

Mia's Rose Creations


Today, I don't have a card to share but I wanted to share this new handmade jewelry Etsy shop, Mia's Rose Creations with you. The jewelry designs are not only unique, but also gorgeous and well made. I own a couple of the bracelets and bought some other pieces as gifts. I was thrilled with the quality and the recipient of my gifts was also very pleased. She told me that she received several compliments on her new jewelry.

I asked Missy if I could use some of her pictures so that I could tell you about her jewelry. She said I could so I picked some of my favorites from the shop to show you below. Be sure to visit for the full selection. If you don't see what you want, ask her about it because I think she does some custom designs. Also, check back often because she frequently has new pieces to add to the shop.


I LOVE these White Turquoise Dangle Earrings. I think they are gorgeous and would look great with the bracelet below. I don't wear dangle earrings but if I did, I would be giving these a new home!


I really like the shades of gray and white in this White Howlite Bracelet. It's such an elegant piece of jewelry and would go with so many different outfits.


This Shiny Teal Faceted Bracelet with the Tree of Life Charm just might be my favorite bracelet currently available in her shop.  I love the color and all the shine of the faceted beads.


This 3 PK Bracelet set is so pretty. They would look nice worn separately or all together. The neutral color means they'll go with so many different outfits. I really like the way the faceted beads pick up the light.


I think this Dark Smokey Gray Crystal Prism necklace would make a bold statement and look so pretty with a turtle neck or sweater.

I only picked five pieces to share with you today but Missy has many more beautiful necklaces, earrings, bracelets to sell individually or in sets. She has druzy jewelry in several different colors.

I hope you'll visit Mia's Rose Creations and see all the beautiful things Missy has available. If you are already done with your Christmas shopping, don't forget that Valentine's Day is just around the corner.

Wednesday, October 25, 2017

Pastor Appreciation Gift Set

Hello! Thanks for stopping by today. It's time for another challenge at Word Art Wednesday. When I saw our focus verse, I knew that it would be perfect for a Pastor Appreciation gift for my husband. 1 Timothy 1:12 says, "And I thank Christ Jesus our Lord, who hath enabled me, for that he counted me faithful, putting me in the ministry." After being in various music ministry positions for 13 years, the Lord called my husband, Tim, to be a pastor. That was over 20 years ago. I know beyond a shadow of a doubt that Tim would say that it is only because the Lord enables him day by day that he is able to care for the people in our church. Not that our people are difficult, they are not. Our church has a wonderful spirit of unity. It's because Tim feels such a great responsibility to lead them correctly and be a good example to them. He is a bi-vocational pastor so he has to do his studying, visiting, etc. outside of his 40 hour work week at a secular job. He sacrifices a lot of himself to spend time studying, praying, visiting, writing cards and notes and checking up on people via texts, emails and phone calls. I believe the Lord rewards Tim's faithfulness by continuing to give him the strength and wisdom to minister to our church family.


Tim is very supportive of my crafting endeavors so I like to do extra special things for him when making a project for him. He likes my notebooks and uses them to write down prayer requests on Wednesday nights and in keeping track of various items at work (separate notebooks). I noticed that his prayer list notebook was looking a little worse for the wear so I made him a new one. This time I tried putting a coordinating patterned paper as a binding around the spine. Along the edge of this I used jute ribbon and twine for decoration. The sentiment panel was inked before being double matted and adhered to the front.


I decorated the edge of the pocket with a strip of the patterned paper. Tim loves to fish so I wanted to use as much of this paper as possible. The interior was looking a little plain so a matted sentiment was also added above the pocket.


Tim sends out LOTS of cards to our church family when they need encouragement. To use more of the patterned paper, I made him a set of four coordinating cards. Two have a "Thinking of You" sentiment and two have a "Thank You" sentiment. I used Sketch #218 from Operation Write Home for my card design.


Here is a picture of the entire gift set.

Notebook Supplies:
Cardstock: Recollections (kraft), Georgia Pacific (white)
Patterned Paper: The Paper Studio
Stamps: WORDart by Karen (1 Timothy 1:12), Rubbernecker Stamps (Smiles & Thinks of You)
Ink: Versafine (Onyx Black), Distress Ink (Vintage Photo)
Tools/Embellishments: Our Daily Bread Designs dies (Double Stitched Rectangles), Staedtler Fine Tip Marker (brown), The Ribbon Boutique (Jute Ribbon), Wright's twine

Card Supplies:
Cardstock: Recollections (kraft, cream, green)
Patterned Paper: The Paper Studio
Stamps: Simon Says Stamp clear stamps (Many Thanks, Banner Sayings 3 x 4 set)
Ink: Versafine (Onyx Black)
Tools/Embellishments: Our Daily Bread Designs dies (Double Stitched Pennant Flags), Staedtler Fine Tip Marker (brown),Gina Marie Designs enamel dots, Cuttlebug Embossing Folder (Herringbone)

I'm entering this project in the following challenges:
Crop Stop Linky Party #33 - Use items/brands found in the Crop Stop store (I used Fiskars, Cuttlebug, Tsukineko, Tim Holtz Distress Ink)
Crafty Hazelnut's Patterned Paper Challenge - Must Use Patterned Paper

Thanks for visiting with me today. I hope you'll come back often. Please be sure to pick up the free digi WORDart at the Word Art Wednesday blog. While you're there, don't forget to see the rest of the Design Team's projects - you are sure to enjoy! Also, if you haven't already done so, why not send your pastor a note of encouragement and appreciation. He will greatly appreciate it!

Friday, April 28, 2017

Watercolor Panel Card Set


Today is my last project as a Guest Designer for the Crop Stop Blog. For today's project, I decided to make a set of cards. Instead of making each card in the set match exactly, I chose to make them coordinate by using the same card design and patterned papers from the same company (all but one of the papers are even from the same 6x6 pad). Black cardstock was used for matting to also help tie the set design together. I had some 3 x 4 pre-printed water color panels that I water colored using Distress inks and markers. For the inks, I smooshed them on my craft sheet and then spritzed them with water using a mini-mister to make the "paint." I used a small paintbrush to apply the color to the image. For the distress markers, I colored right on the panel and then moved the color around with a brush and plain water. After they dried, I stamped sentiments on three of them with Versafine ink and the added some Wink of Stella for a little shimmer. Below are closeups of each card.


 The golden yellow strip is from the Basic Gray Urban Luxe 6x6 paper pad. It also uses a coordinating embossing folder and embossing border folder from Anna Giffin.


Supplies from the Crop Stop Shop:
Distress Pads - various colors
Distress Markers - various colors

Cricut Cuttlebug - Machine, Spacer A, Cutting Pad B, Adapter C
Inkssentials - Mini Misters

Brands found in the Crop Stop Shop:
Cricut Cuttlebug - Embossing Folder - Anna Griffin-  Juliette Lace folder and border folder
Zig - Wink of Stella Brush marker - Clear
Tsukineko - VersaFine ink - Onyx Black

Other Items Used -
Recollections cardstock - black
The Paper Studio heavyweight cardstock - white
Basic Gray 6 x 6 pads - Hillside (retired), Urban Luxe (retired)
Taylored Expressions 3x4 Watercolor Panels - Keep in Touch
Kaisercraft clear stamp set - Secret Garden (Cards 1 & 2 above)
My Sentiments Exactly clear stamp set - Inspirational Birthday Innies and Outies (Card 3 above)
Sweet 'n Sassy Stamps die - Lacey Eyelet Border (retired)

I'm entering this card in the following challenges:

Dare 2B Artzy - Anything Goes
CraftyHazelnut's Patterned Paper Challenge - must use patterned paper
Outlawz Twisted Thursday Challenge -Anything Goes

Thanks for stopping by to visit with me today. I hope you'll come back soon. Thanks again to Esther and the Crop Stop Shop for allowing me the honor of being a Guest Designer for the blog these last two weeks.

Wednesday, December 30, 2015

Bought with a Price

I hope you had a wonderful Christmas and were able to celebrate Christ's birth with friends and family. Both of our children, their spouses, our grandson and new grand-puppy were here for Christmas. What a rare treat (both of our children live 8 hours away from us and from each other)!! This mama soaked in lots of good memories to treasure now that they've all returned to their homes.

It's time for the last Word Art Wednesday challenge for 2015. Starting in 2016, the Word Art Wednesday challenges will each last 2 weeks. This will give you more time to play along. As always, we have some wonderful sponsors so you'll want to be sure to keep joining us and linking up your projects. This week we're looking at 1 Corinthians 6:20, "For ye are bought with a price: therefore glorify God in your body, and in your spirit, which are God's." The baby in the manger that we celebrated last week, grew up to become the Savior that died on the cross to pay the price for our sins. Glorifying God, obeying His commands and living for Him, should therefore just come naturally to us. After all, we belong to Him.


One of our fantastic sponsors this week is Fresh Brewed Designs. I've been wanting to color this image they designed for a long time. I've never really colored eyeshadow on an image before so this was something new for me. I used a little glaze pen on the lipstick to give it some shine. The image is double matted.

After coloring the image, I decided to put her on a notebook cover instead of a card. I thought this week's verse was so appropriate for a Bible Journal or Prayer Journal. This particular notebook will hold a Jr. Legal size paper pad and you can replace the pad when you need more pages. The pad measures 5" x 8".  I cut a piece of teal cardstock 10 3/4" x 8 1/4".  It is scored on the long side at 5 1/4" and 5 1/2". The patterned paper panels on the front and the interior are 5" x 8". The finished closed size of the notebook is 5 1/4" x 8 1/4".


The interior of the notebook has a pocket for small keepsakes or a book mark. The finished pocket measures 5-1/8" wide x 5" tall. This is also the size of the pocket that holds the paper pad. The cardboard backing slips down into the pocket. For more detailed directions on how I made the notebook, please leave me a comment below or email me using the Contact Me link in my profile.

Supplies:
Cardstock: Georgia Pacific (white), Coredinations Ranger/Tim Holtz line
Patterned Paper: DCWV (The Blossom Song 12 x 12 Stack)
Stamps: WORDart by Karen, Fresh Brewed Designs
Copics: BG10, 11, 13, 15, 70; R20, 22, 24; C5; 100; E00, 11,13, 25, 29, 31, 33, 34, 35, 50
Tools/Embellishments: Spellbinders dies (Labels 4, Labels 4 Small), Fiskars border punch (Apron Lace), Sakura Glaze pen

I'm entering this notebook in the following challenges:
Sweet Stamps December Challenge - Anything Goes
Through the Craft Room Door - Anything Goes
Hiding in My Craft Room Challenge #231 - Freestyle
Mod Squad Challenge - Use at least one die cut

Thanks for visiting with me today. I do hope you'll play along with the challenge at Word Art Wednesday. Be sure to stop by the blog for your free digi and to see what the rest of the Design Team have made. Happy New Year!!

Monday, August 10, 2015

Countdown to Fun

My project for this week's Take Your Pick challenge at The Kraft Journal is a countdown calendar for our 5 year old grandson. It is designed to help him count down the days until my husband and I go to visit him on his birthday weekend. I was able to pack 4 (red, embossing, die cuts, and washi tape) of the 8 choices in the simple design of the front cover. I started with a base of Lunch Bag Kraft cardstock (my favorite The Kraft Outlet cardstock). The folded size of this project is 5" x 8". My cardstock base is in two sections. The first piece was cut to 8" x 10.5". It was scored on the long side at 5" & 10". The second piece was cut at 5" x 8". I added scrappy tape (like Scor-tape) to the 1/2" strip on the first panel and used that to adhere the smaller panel. This gave me a strip 15" long that was scored at 5" & 10" in mountain and valley folds. Since I only needed 3 places to put my calendars, I folded the last setion back and adhered the sides to make a pocket. {That is probably clear as mud since I forgot to take pics of the construction process. See the last picture in this post for a little clarification.}

For the cover red cardstock and patterned paper  was layered over the base kraft cardstock. Using a VersaMarker, all the cars  were embossed with clear embossing powder. The computer generated sentiment and a red mat were die cut. A piece of white cardstock was cut as a mat for the sentiment and then covered with Notebook Grid Paper Tape (aka washi tape).


I printed 3 monthly calendars that I found as free downloads on the internet. I then added the countdown numbers with a black sharpie.


The final month of the countdown calendar is on the back. Stickers to mark off each day are tucked into the pocket.

Supplies:
Cardstock: The Kraft Outlet (Lunch Bag Kraft), Georgia Pacific (white), Core'dinations (red)
Patterned Paper: Echo Park (Little Boy 12 x 12 collection)
Computer generated sentiment
Tools/Embellishments: Versamarker, Sharpie black marker, Stampin' Up! embossing powder (crystal clear),  Notebook Grid Paper Tape (The Kraft Outlet), Spellbinders dies (Classic Rectangles Large), Stickers from the Dollar Store

Thanks for visiting with me today.  I hope you'll be able to play along in this week's Take Your Pick Challenge.

Monday, August 3, 2015

Back to School Book Worm

Note to my email subscribers: You might have gotten two emails about this blog post. One from my old provider and one from the new. I'm sorry for the duplicate but I wanted to make sure the new sender was up and running properly before discontinuing the old. Thanks for your patience.

For this week's Back to School Challenge at The Kraft Journal, I chose to make an extra large card (5.25" x 8.25") for our grandson. A large tag was cut from Lunch Bag Kraft Cardstock for the inside of the bag. A piece of white cardstock was layered on top and embellished with Notebook Grid Paper Tape. This tape was also used to made a hole reinforcement for the top of the tag. To make the reinforcement, I lined up two short strips of tape side-by-side on a piece of white cardstock. Using a small circle die, I die cut a circle and then punched a hole in the middle with my Crop-o-Dile. White Twill Tape was threaded through the hole and tied off with baker's twine.

After inserting the tag into a  Large Notebook Merchandise Bag, I wrapped Red , Brown Kraft  and Dark Green Baker's Twine around it. A button from my stash was added to the twine before tying it off in a knot. I then adhered the bag to a base of Lunch Bag Kraft Cardstock. The top of the base was trimmed to match the shape of the bag. I matted the Copic colored image and a piece of a Vintage Dictionary Page on cardstock from my scrap basket and layered them on the bag front. More scrap cardstock was cut into fishtail banners to add to the top of the bag. The computer generated sentiment was added to a die cut banner and popped up over the baker's twine. The worm's glasses and the highlights on the apple were accented with a glaze pen. Our grandson's name was written with a Sharpie near the top of the bag.


Supplies in addition to those listed above:
Cardstock: Georgia Pacific (white), scraps from my scrap basket
Stamps: Digi Stamps 4Joy (Book Worm)
Copics: Worm (G03, 07, 09; Y13, 17), Hat (N3, 5, 7, 9; Y35), Apple (R22, 24, 27; E25), Books (#1 - B21, 23, 26; E40, 50; #2 - E000, 02, 07, 08, 09; #3 - BG72, 73, 78; E40, 50; #4 - $22, 24, 27, 29; N0, 1, 3; #5  E31, 33, 35, 37, 40, 50; #6 - Y000, 32; YG03, 05; G14; E31)
Tools/Embellishments: Sakura glaze pen, Crop-o-dile, Spellbinders die (Standard Circle Small), Simon Says Stamp die (Folded Banner)

I'm entering this card in the following challenges:
Eureka Stamps Challenge #152 -  Washi tape
Digi Choosday Crafting Challenge Week 30 - Animal (of any type)
Simon Says Stamp Wednesday Challenge - Anything Goes
4 Crafty Chicks Challenge #257 - Anything Goes
Craft Your Passion Challenge #273 - Anything Goes
Outlawz Twisted Thursday Challenge - Anything Goes

Thanks for visiting with me today. I hope you'll play along in this week's Back to School challenge!!

Monday, July 20, 2015

Purse-Sized Gift Set Duo

For this week's Anything Goes - NO Cards challenge at The Kraft Journal, I chose to make a gift set for our daughter of a purse-sized notebook holder and a business card wallet. Both items have a base of Buff Cover Weight Cardstock with Lunch Bag Kraft Cover Weight Cardstock used to mat the patterned paper and sentiments. All the computer generated sentiments and the business cards were printed on Buff Cover Weight Cardstock


Our daughter has loved books since her toddler days and we spent hours upon hours in the library during her childhood. For this reason, I thought the vintage library card catalog paper was quite appropriate. She has turned that love of reading into a career and is now a published author and style editor. And yes, I am her biggest fan! :)


The interior of the business card holder uses two Lunch Bag Kraft Card Sleeve Envelopes that were covered with patterned paper to hold the cards. Since I don't have one of her current business cards, I made these sample cards as props to use during the project's photo shoot.  Her website, K. D. Winchester, is publishing focused and covers a broad range of  items.  On her blog, she does frequent book reviews from all types of genres. If you have specific questions about the content of a certain book, feel free to ask her via her contact page.


Kendra loves book lists and has quite a lengthy "Books I Want to Read" list of her own. I thought this quote on the front of the notebook holder was quite appropriate. The notebook holder is embellished with an Antique Silver Label Holder

The interior of the notebook holder has a 3 x 5 notepad. The backboard of the notepad slips into a pocket so that it can be replaced when all the sheets are gone. The front cover has a pocket where small items can be tucked for safe keeping. The finished size of the notebook holder when closed is 3.75" x 5.5".
For extra stability, the spine of the holder was also covered with cardstock mat and patterned paper layer.

Supplies:
Cardstock: Buff Cover Weight Cardstock and Lunch Bag Kraft Card Stock - The Kraft Outlet
Patterned Paper: Bo Bunny (Weekend Market Collection 6x6 pad)
All sentiments computer generated
Tools/Embellishments - Antique Silver Label Holder & Lunch Bag Kraft Card Sleeve Envelopes (The Kraft Outlet), Marvy 3/4" Circle Punch, Spellbinder dies (Labels 7), brads (The Paper Studio), Distress ink (I just used whatever was left on my sponge dauber  - I suspect a combo of walnut stain and tea dye)

I'm entering this duo in the following challenges
Digi Chooseday Week #28 - Use something old (I've had this paper for a long time)
Crop Stop Linky Party #6 - Use something found in the Crop Stop Store (Distress Inks - Walnut Stain, Tea Dye)
Scrapy Land Challenge #22 - Vintage + must use die brand that Scrapy Land carries (I used Spellbinders)

Thanks for visiting with me today.  I hope you'll come back often and that you'll participate in The Kraft Journal's Anything Goes - NO Cards challenge this week.

Wednesday, November 12, 2014

Menu Planning Board

A customer sent me this link to a Menu Planner and asked me if I could make one.  She wanted to give it as a birthday gift to a friend.  This friend has some of Sara Mincy's artwork in her home and really likes that style.  As I looked at Sara's blog I noticed she has lots of bright colors, mixes solids, stripes and polka dots and even has some collage type designs several places in her home.


The way this board works is that you write the meals you make for your family on pieces of cardstock.  On the back of this you write what ingredients you need to have to make it and the location of the recipe.  This helps with planning your grocery shopping list and makes finding the recipe easier.  You can color code your meals to help with variety.  Example: Red meat on red cardstock, meatless meals on green, chicken/fish on yellow, easy meals (soup/sandwiches, eating out, church dinner, etc.) on white.  Use whatever works for your family.  Then you can use packing tape to laminate these meal strips for durability.  My customer is taking care of this part of the project so I just made white strips (1.5" x 3.5") to help me with spacing.  The strips are stored in the top box.  The meals you choose for the week are attached to the appropriate clothes pins and after the week is over moved to the bottom box.  Once the bottom box is full, all strips return to the top box and the process starts over. This helps prevent constant repeats.

I started with an 11x14 canvas.  I cut scraps of scrapbook paper and cardstock into squares and rectangles and Mod Podged them all over the canvas.  I then gave it a couple extra coats of Mod Podge for durability.  The eventual owner has several young children and will hang this in her kitchen so I tried to seal everything for durability and ease of cleaning.


I wrapped washi tape around the edge of the canvas and then sealed it with at least 2 coats of Mod Podge.   The clothes pins have washi tape on the top that is also sealed.  The days of the week were stamped and then punched out and backed with another punched circle from cardstock.  Again these were sealed before being adhered to the clothes pins with Multi Medium Matte. The clothespins were adhered to the canvas using hot glue.


The boxes were made by covering thin chipboard with cardstock.  Decorative edge dies were used on the corners.  The boxes were sealed and adhered to the canvas with hot glue.  The letters, heart and star were painted with acrylic paint.  After being sealed they were attached with hot glue.  The star, heart and scalloped border were given Enamel Accent polka dots.  Strong magnets were attached to the back with Glossy Accents so that it can be hung on the refrigerator.


This board was a lot of fun to make.  I haven't used this much paint and glue in a long time.

Tip for Top Tip Tuesday: When covering clothespins, to make coating with paint or Mod Podge easier, clip the pins to a folded piece scrap piece of paper. Line the pins up on one edge and tuck the other side of the paper under something heavy on a bookshelf.  The fold allows them to hang free to dry.

Supplies:
Cardstock & Patterned Paper - Many from my scrap basket
Stamp Set (Scrappy Cat  - Letter Sweater clear stamp set)
Ink:  VersaFine (Onyx Black)
Other items: Plaid Acrylic Paint (Black, Real Blue, Red Apple), Mod Podge (matte), Bella Blvd Washi Tape (gulf Dot), Craft Essentials Washi Tape (red and blue dot), My Favortie Things Die-namics (Mini Scallop Edge), Spellbinders Die (Fair Isle Border Petites), Marvy Circle Punches (3/4" and 1"), Wooden Letters, Star, Heart (Plaid Wood Letters 1-1/4" Collegiate), clothes pins (Canvas Corp - Canvas Home Basics), magnets (Horizon Group Super Strong Neo Magnets), Ad Tech Hot Glue Gun/Glue Sticks, Enamel Accents (white)

I'm entering this project in the following challenges:
Always Anything Goes With a Twist Challenge #6 - Use a Canvas
Scrapbook Blessings Club #33 - Anything Goes
Craft Your Passion Challenge #239 - Begins with B (board, boxes, blue)
Top Tip Tuesday Challenge - Use 3 or More Papers
Simon Says Stamp Wednesday Challenge - Use at least one star

Thanks for stopping by today.  And don't forget to step out of your comfort zone (bright colors are outside of mine) sometimes when crafting and see what happens.

Wednesday, October 15, 2014

Quote Collection 4 from ODBD


Happy Wednesday!  We can definitely tell it's fall here in our corner of the world.  It's rainy, the temps are cooler and the trees are beautiful with the various color leaves.  I love fall!  Anyway...., it's Wednesday and that means it's time for another challenge at Word Art Wednesday.  This week our sponsor is Our Daily Bread Designs (aka ODBD).  ODBD generously provided the design team with stamps to use for this week's challenge.  I chose to use Quote Collection 4.  It has five inspirational and encouraging quotes in the set. 


For my first project, I made a tri-shutter card using the Corrie ten Boom quote from the set.  I embellished the card with pearls and ribbon.  The bigger center panel has room for a personal message.

This set was so much fun that I couldn't stop with just one project this week.  I used another quote on the notebook below.  While this specific notebook was a gift for a friend, this style of notebook has quickly become a best-seller for my Sasha Belle Designs endeavors. The matching pen is a popular added touch.


The interior front cover has a pocket and the back of the notepad slips into another pocket so that it can be replaced.  I love these papers.  They are easy to work with and don't need a lot of extra embellishment. The finished notebook is 8.25"x5.25" when closed.


Supplies for the two projects above:
Cardstock: Bazzill (purple), Recollections (cream)
Patterned Paper: The Paper Place
Stamps:  Our Daily Bread Designs (Quote Collection 4)
Ink:  Versafine (Onyx Black), Versamark (card)
Tools/Embellishments:  Want2Scrap (pearl flourish and gems), Spellbinders dies {Classic Ovals Large and Small, Floral Ovals (notebook), Lacey Ovals (card)}, May Arts ribbon (card), Stampendous white opaque embossing powder (card)

Here is another smaller notebook that showcases another stamp from the set.  I really like this quote.  The interior of the notebook has a pocket, 3x3 post-it note pad and a 3x5 replaceable notepad.  The finished size is 3.75"x5.5" when closed.  Both notebooks make great gifts.


This was the first opportunity I've had to stamp with ODBD stamps.  They are a purple (how cool!) rubber stamp mounted on cling foam.  They are pre-cut really well.  I was most impressed with how crisp they stamp.  I've stamped them using VersaFine and VersaMark inks and been very happy with the outcome every time.  They didn't require any prep before using them and it's quite easy to get full ink coverage.  I definitely have some other sets on my wish list and would highly recommend them for their high quality.

Be sure to play along with us this week for an opportunity to win some ODBD stamps of your own.  I hope you'll take time to visit the WordArt Wednesday Blog to see other projects from the rest of the design team.

Thanks for visiting today.

Friday, October 3, 2014

There's a New Challenge Blog in Town!!

Today a new challenge blog, Anything Goes With a Twist, is launching and Deedee's Digis is a sponsor for this first challenge.  Anything Goes With a Twist is a blog for card and non-card projects.  Each challenge will be Anything Goes but with a "twist."  They kept it easy for the first one and there isn't a twist - it's just Anything Goes.  :)   The blog has all the rules/details for participation.


My project today uses two sets from Deedee's Digis:  Turtle-rific Day and Teacher's Pet.  This is a birthday card/gift card holder. You can find one I made with a coffee theme and only one gift card here.  A YouTube tutorial by Holly Krautkremer gave me the inspiration for this project.


I used the pre-colored owl from Teacher's Pet as the focal image. The owl was printed, fussy cut and popped up on the Happy Birthday circle.  The matted image panel is attached to a belly band that holds the card closed. Some glossy accents to the owl's eyes and beak give him some fun dimension.


Two little "file cards" provide a place to write a personal message and tuck into their own little pocket.  This card was for our son-in-law's birthday.  He always makes a point to write a note in cards that he and our daughter send to us.  So, my husband and I wanted to both send him a note on his birthday. Having two little cards gave us both room to write our birthday messages.


Here is the card completely opened up.  The two little note cards are in the top pocket and then we put gift cards in the bottom two pockets.

Supplies:
Cardstock: Recollections (kraft), Georgia Pacific (white), Core'dinations (chipped sapphire)
Patterned Paper:  My Mind's Eye (Remarkable)
Stamps:  Deedee's Digis (Turtle-rific Day and Teacher's Pet)
Tools/Embellishments:  Spellbinders Dies (Petite Scallops Circle Large, Labels 4, Labels 4 Small, Standard Circles Small), My Favorite Things Die-namics (Pinking Edge), Glossy Accents

I'm entering this card in the following challenges:
Sentimental Sundays #226 - Use Kraft Cardstock
Scrapbook Blessings Club Challenge #30 - Anything Goes
Cute Card Thursday Challenge #341 - Spots and Dots
The ABC Challenge - U is for Unique
CraftyHazelnut's Patterned Paper Challenge - Must cover base w/Patterned Paper

Thanks for visiting me today.  I hope you'll play along in the new challenge over at Anything Goes With a Twist. You could win a $10 shopping spree to Deedee's Digis.

LinkWithin

Related Posts Plugin for WordPress, Blogger...