When the Sweet 'n Sassy Connection closed, that also ended the weekly Say It with Scripture Challenge that I was hostessing. For those of you who enjoy using Scripture on your cards, I have discovered two other blogs that have weekly challenges to use Scripture and thought I would share them with you.
Word Art Wednesday - they have a weekly challenge to use Scripture or inspiring quote on your project. They give a free weekly digi. You are free to use that Scripture for your project but don't have to do so.
Little Birdie Blessings Scripture Thursday - you may link up to four projects that have Scripture on them during each two week challenge.
Please be sure to check out both of these sites. I hope you enjoy them as much as I do.
If you know of other sites that have Scripture challenges, please leave a comment letting me know.

Saturday, April 28, 2012
Friday, April 27, 2012
Morning Glories - SNSDC51
This week's Sweet 'n Sassy Digi challenge is to make a project inspired by this quote from Thomas Tusser, "Sweet April showers do spring May flowers." I've really liked this Morning Glory digi stamp ever since I first saw it.

I colored them with my copics and then did a very brave thing....I used the telescoping image technique to layer it. Whew! It turned out OK and I didn't ruin my images. You can find a great telescoping image tutorial by Beate Johns. I used Papertake Weekly Sketch #67 for the card front.

I went back & forth trying to decide whether to use a sentiment on the front. In the end, I decided to leave it plain. I used a Spellbinders M-bossabilities folder and highlighted the embossing with a sponge dauber and some distress ink. Some pearls, liquid pearls, a border punch and an organdy bow finished it off.
I did some interior decorating on this card and used the Psalm 30:5b digi stamp for the sentiment.

Supplies:
Cardstock: Georgia Pacific, Recollections
Patterned Paper: Echo Park (Times & Seasons)
Stamps: Sweet & Sassy Digis (Morning Glory, Psalm 30:5b)
Ink: Tim Holtz Distress Ink (Antique Linen, Tea Dye)
Embellishments/Tools: Ribbon Trends organdy ribbon, Recollections pearls, Liquid Pearls (buttercup), Fiskars border punch (Apron Lace), Spellbinders (M-bossabilities (Whimsy A), Lacey Squares, Labels 3)
I'm entering this card in the following challenges:
Flourishes Timeless Tuesday #166 (FTTC166) - Bingo {I chose the bottom row - blue, flowers, emboss)
Stamptacular Sunday #160 - Loaded with layers
Love to Create Challenge #12 - Anything Goes
Die Cuttin Diva #62 - Pearls, Pins and/or Punches {I have pearls and a border punch}
Crafty Friends Challenge #2 - Use two die cuts
Word Art Wednesday #25 - Use Scripture
Scripture Thursday #26 - Use Scripture
Simon Says Stamp - Anything Goes
Thanks for stopping by today. I hope you get a chance to play along with us this week.
Friday, April 20, 2012
SNSS April Digi Stamp Release & SNSDC50

**Be sure to read to the end of this post to find out how to save 40% on your order from Sweet 'n Sassy Stamps!!**
This week we're mixing it up a bit for our Sweet `n Sassy Digi Challenge . The Digi Challenge DT are bringing you a fun Blog Hop to show off our April Digi Stamp Release!!
While you're hopping, be sure to leave a comment on each blog along the way because one of the ladies is a mystery blogger and she will be picking a random winner from the comments on her blog post to win a very special prize. What is the prize? I'm so glad you asked! It's the WHOLE April Digi Release!! The winner will be announced on the Sweet `n Sassy Digi Challenge Blog next Friday, April 27th.
This week's challenge is to make it old. We were to use distress/sponge techniques to make our project look old or vintage. My card has lots of sponging on it but I'm not sure I captured "old." Ah well, I did try. :)

I got to play with the Opal Owl digi stamp. I think she's adorable and just perfect for paper piecing. I explained a little last week how I paper piece digi stamps. In the next few days, I'll have a more complete tutorial with pictures ready for you.

I used several embossing folders in my Cuttlebug to add texture to the tree and grass. I have to thank my "design assistant" (aka my husband *grin*) for his suggestion of using a tree, for the "hill" of grass and the suggestion of using a small owl on the inside. Gotta give credit where credit is due. After running the tree top, tree trunk, and grass thru the embossing folders, I sponged them with ink to brink out the embossing. I used the ink pad directly on the paper on the hill before running it thru my embossing folder. Yes, the tree does go off the top and side of the card a bit. However, I know I'm not sending this thru the mail in a regular envelope so it's all good.


This is a gate-fold card. You can find a tutorial on how to make them over on SCS. A card like this just *has* to have interior decorating. Here's how I finished the inside of my card.

Supplies:
Cardstock: Georgia Pacific, Recollections, Bazzill
Patterned Paper: Basic Grey (Oxford - green paper), KaiserCraft (Chanteuse)
Stamps: Sweet 'n Sassy Digi Stamps (Opal Owl, Enjoy the View)
Ink: Memento (Bamboo Leaves, Rich Cocoa), ColorBox Fluid Chalk (Chestnut Roan)
Embellishments/Tools: Baker's Twine (The Twinery - Cappuccino, Honeydew, Cotton Candy), Spellbinders (Standard Circles - Lg & SM, Eyelet Circles), Cuttlebug Embossing Folders (Distressed Stripes, Victoria, Bird Call), Crystal Effects, Signo Opagque White pen, Sakura Clear Star Pen, SU Stampin' Write Pen (Closer to Cocoa), Copic marker (100 - Black),Martha Stewart Border Punch (used for grass)
I'm entering this card in the following challnges:
Terrifically Thrilling Thursday - Show Us What You Got (Anything Goes)
Stamptacular Sunday #159 - Freebie Week (Anything Goes)
Paper Sundaes #166 - Anything Goes
Craft Your Passion #106 - Die Cuts & Punches
Papertake Weekly - A Stitch in Time (real or faux stitching)
Paper Pretties Wednesday Challenge (PWC202) - A card for a girl
Paper Pretties Monday Challenge (PPMC35) - Embossing - dry or wet
Crafty Friends Challenge #2 - Two or more diecuts
Crafty Friends Challenge #2 - Two or more diecuts
Please remember to use only digital images for the challenge. Each card you enter in the challenge will get you one entry to be eligible to win three digis of your choice. You don't have to use a SNSS image but if you do you'll receive an extra entry. When uploading to online galleries, please use keyword SNSDC50.
I have one last thing to tell you before you head off to the DT blogs to see more of the new April Digi Stamp releases....

Now head off to the DT blogs to see Make It Old creations...
Thanks for stopping by today. I hope you'll come back soon.
Monday, April 16, 2012
Clearsnap Giveaway
Friday, April 13, 2012
Take Time...Enjoy the View - SNSDC49
This week's challenge at the Sweet 'n Sassy Digi Challenge Blog is as Cute as a Bug & Button. Yep, you need to use a bug and at least one button on your project. Like a lot of folks, bugs are usually not something I'm overly fond of but the bugs in the Sweet 'n Sassy Store are so cute you can't help but smile when you see them!

My card uses the Toadstool Digital Stamp. This stamp is fun to color and, at $0.99, is a bargain! I used the sentiment from the Enjoy the View Digital Stamp Set. My card sketch came from Mojo Monday (MOJO236). I colored the image with my copics and then went over the spots and the caterpillar with a glaze pen. The round buttons are threaded with baker's twine. The little snail is actually a button. It had a shank on the back that I snipped off with wire cutters. Each button is held on with a glue dot. I used a brown fine point marker for faux stitching. I die cut the border with a Spellbinders border die.

__________________________________________
If you are new to digis, you may wonder how I got the sentiment on the patterned paper without wasting a whole sheet. Here's my method for printing a digi stamp on patterned paper -- whether it's a sentiment or if I'm paper piecing. I print my sentiment/image on regular copy paper first. Then I cut a piece of patterned paper bigger than the image and apply adhesive to the wrong side on just the edge of the paper that will go into the printer first. {All printers are different but for me this is the top edge.} Then I adhere the piece of patterned paper over my image on the copy paper. I try to make sure that the adhesive is above where the image will print. I then run the copy paper back thru the printer. By adhering the edge that goes into the printer first, I've never had a problem with jams. If I'm paper piecing I always print one image on cardstock. Then after cutting out the pieces from my patterned paper, I glue them to the cardstock image.
For the sentiment on this card, I had a patterned paper strip cut about the size I needed. I then held the copy paper with the sentiment printed on it and my patterned paper up to the light to know where to position the patterned paper.
Give it a try. With a little practice, this opens up a whole knew world when using digi stamps.
__________________________________________
Supplies:
Cardstock: Recollections (kraft), Georgia Pacific (white for image)
Patterned Paper: Basic Grey (Picadilly)
Stamps: Sweet 'n Sassy (Toadstool, Enjoy the View)
Tools/Embellishments: Ribbon (Morex Corp), Baker's Twine (The Twinery), SU Stampin' Write (Close to Cocoa), Spellbinders (Big Scalloped Border Petites), Sakura Glaze pen
I'm entering this card in the following challenges:
Mojo Monday (MOJO236) {sketch}
Paper Sundaes #115 {Sundae bar - use two of the following: kraft, die cuts, lace, and/or charms. I used a die cut border and kraft cardstock}
Paper Pretties Monday Challenge (PPMC34) {use 3 or more layers}
Paper Pretties Wednesday Challenge (PWC201) {Use 2 or more designer papers}
Really Reasonable Ribbon #45 {Buttons & Bows}
Going Grey with Scrap-Creations {Spring}
Thanks for stopping by today. I hope you'll play along with us this week.

My card uses the Toadstool Digital Stamp. This stamp is fun to color and, at $0.99, is a bargain! I used the sentiment from the Enjoy the View Digital Stamp Set. My card sketch came from Mojo Monday (MOJO236). I colored the image with my copics and then went over the spots and the caterpillar with a glaze pen. The round buttons are threaded with baker's twine. The little snail is actually a button. It had a shank on the back that I snipped off with wire cutters. Each button is held on with a glue dot. I used a brown fine point marker for faux stitching. I die cut the border with a Spellbinders border die.

__________________________________________
Printing on Patterned Paper Tutorial
If you are new to digis, you may wonder how I got the sentiment on the patterned paper without wasting a whole sheet. Here's my method for printing a digi stamp on patterned paper -- whether it's a sentiment or if I'm paper piecing. I print my sentiment/image on regular copy paper first. Then I cut a piece of patterned paper bigger than the image and apply adhesive to the wrong side on just the edge of the paper that will go into the printer first. {All printers are different but for me this is the top edge.} Then I adhere the piece of patterned paper over my image on the copy paper. I try to make sure that the adhesive is above where the image will print. I then run the copy paper back thru the printer. By adhering the edge that goes into the printer first, I've never had a problem with jams. If I'm paper piecing I always print one image on cardstock. Then after cutting out the pieces from my patterned paper, I glue them to the cardstock image.
For the sentiment on this card, I had a patterned paper strip cut about the size I needed. I then held the copy paper with the sentiment printed on it and my patterned paper up to the light to know where to position the patterned paper.
Give it a try. With a little practice, this opens up a whole knew world when using digi stamps.
__________________________________________
Supplies:
Cardstock: Recollections (kraft), Georgia Pacific (white for image)
Patterned Paper: Basic Grey (Picadilly)
Stamps: Sweet 'n Sassy (Toadstool, Enjoy the View)
Tools/Embellishments: Ribbon (Morex Corp), Baker's Twine (The Twinery), SU Stampin' Write (Close to Cocoa), Spellbinders (Big Scalloped Border Petites), Sakura Glaze pen
I'm entering this card in the following challenges:
Mojo Monday (MOJO236) {sketch}
Paper Sundaes #115 {Sundae bar - use two of the following: kraft, die cuts, lace, and/or charms. I used a die cut border and kraft cardstock}
Paper Pretties Monday Challenge (PPMC34) {use 3 or more layers}
Paper Pretties Wednesday Challenge (PWC201) {Use 2 or more designer papers}
Really Reasonable Ribbon #45 {Buttons & Bows}
Going Grey with Scrap-Creations {Spring}
Thanks for stopping by today. I hope you'll play along with us this week.
Tuesday, April 10, 2012
Hallelujah! What a Saviour!


I really enjoyed the tent card I made several weeks ago, so I decided to make another one. I kept the card pretty simple so that the focus would be on the empty cross. I'm so thankful for what the Lord did for us on the cross and that He paid our sin debt once and for all. Hallelujah! What a Saviour!!
Supplies:
Cardstock: Recollections, Georgia Pacific
Patterned Paper: Paper Studio
Stamps: Sweet 'n Sassy (Old Rugged Cross digital stamp), computer generated sentiment
Tools: Spellbinders (Eyelet Circles, Standard Circles), Cuttlebug embossing folder (Allegro), ColorBox fluid Chalk (chestnut roan), Copics, CM square punch (used to make banner)
I'm entering this card in this week's Stampin' Sisters in Christ Challenge #134 to make a joy-ful card or one that celebrates something.
Thanks for stopping by today!
Friday, April 6, 2012
Beary Special Easter - SNSDC48
It seems like forever since I've posted. Thanks for all the kind comments, get-well wishes, and most of all, for your prayers. I am feeling a lot better and am almost back to full-strength. The Lord is so good.
This week's challenge at the Sweet 'n Sassy Digi Challenge Blog is to make an Easter card or project. I chose to make some gifts for our daughter and some of her friends.

Due to some health issues, our daughter hasn't found a candy that agrees with her. Since I couldn't send her the normal Easter treats, she said, "If you could find some dates, Mom, that would be awesome." After a little searching, I found a store that carried them (apparently some stores consider them a seasonal item).

I wanted to cover up the label so I used the Easter Rhubarb Digital Stamp Set to make a dressed up label. I used Spellbinders Label 4 (small and large), and some pretty papers to set off Rhubarb and the sentiment. Scor-tape works wonders when applying a flat label to a rounded object.
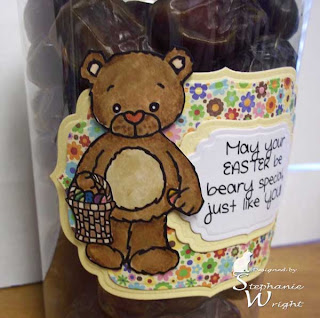
Rhubarb is colored with Copics. It's hard to see but all the eggs are colored with various glitter pens.

To package it up, I put a patterned paper circle on the lid, put it in a plastic treat bag and finished off the top with baker's twine and a tag.
Supplies:
Cardstock: Georgia Pacific
Patterned Paper: Jillibean Soup, MME
Stamps: Sweet 'n Sassy Stamps (Rhubarb's Easter)
Tools/Embellishments: Spellbinders Labels Four (small and large), baker's twine (The Twinery), copics, Sakura Gelly Roll Pens, Scor-Tape, Cuttlebug, SU tag punch, CM Fine Tip Journal Pen (black)
I usually send some treats for our daughter's roommates and friends. I decided to make some sour cream containers and fill them with jelly beans. {You can find a tutorial for making them on SCS here: Sour Cream Container. You can see some other sour cream containers I've made in the posts here and here.} Once again, my paper started out at 4" x 6" and I used my scor-buddy instead of a crimper for the ends.

Supplies:
Cardstock: Georgia Pacific
Patterned Paper: MME
Stamps: Sweet 'n Sassy (Easter Blessings Digital Stamp Set)
Tools/Embellishments: Spellbinders Circles (large & small), baker's twine (The Twinery), Scor-buddy

Supplies:
Cardstock: Georgia Pacific, AC Moore
Patterned Paper: SEI
Stamps: Sweet 'n Sassy (Easter Blessings Digital Stamp Set)
Tools/Embellishments: Spellbinders Circles & Lacey Circles, baker's twine (The Twinery), Scor-buddy
I used two different papers: a plaid for our daughter's boyfriend and another guy friend that we've "adopted" as a nephew and a floral for the girls. I used one of the sentiments from the Easter Blessings Digital Stamp Set on the tags and attached the tags with more baker's twine.
I've already heard from our daughter that they are a hit. :)
Come play along with us this week. Remember you must use a digi stamp. While it doesn't have to be a Sweet 'n Sassy digi, Korin sure has a lot of fantastic ones in the store.
Thanks for stopping by today!
Subscribe to:
Posts (Atom)