Tuesday, January 15, 2013

What a Joy!

I really enjoy making cards but I also enjoy other paper crafts.  I've been wanting to make another tea bag wallet for awhile now.  They are quick, easy and fun to put together.  You can see my first one and a link to the tutorial on how to make your own in my blog post here.


I love the Friendship Collection Sentiments at Daydream Designs.  There are a total of 12 friend-themed sentiments in the set.  I thought this one was perfect for the focal point of the top of this tea bag wallet.


I put pearls on each scallop around the oval.  I dotted the "j" in joy, the "i" in friend and the exclamation point with a tiny green pearl.  I used stickles to emphasize the words "joy," "you," and "friend."  I also accented different parts of the patterned paper design with stickles.  Three pink rhinestones finish off the sparkle & bling.


The inside of the wallet has room for 6 tea bags.  This time I focused on Breakfast Teas.  OK, I confess, I chose them from the package because they went with the color scheme the best.  :)  It just happened to turn out that they were both breakfast teas.  Not being a tea drinker, I'm not sure if this is a good thing or not.  I hope it is.  :)

Supplies:
Cardstock:  Bazzill, Copic
Patterned Paper: The Paper Studio
Stamps:  Daydream Designs (Friendship Collection Sentiments)
Tools/Embellishments:  bling & pearls (Recollections), Stickles (Star Dust), Spellbinders (Petite Ovals Large and Small, Petite Scalloped Ovals Large), tea (Twining's -English Breakfast Tea, Irish Breakfast Tea)

I'm entering this wallet in the following challenges:
Tuesday Throwdown #130 - Frame It
Terrifically Thrilling Thursday - Anything Goes
Spark Your Creativity Now #5 - Anything Goes
Crazy 4 Challenges #168 - Shape it up (anything but an A2 or square card)
Word Art Wednesday #62 - Anything Goes
Cute Card Thursday #251 - Beat the Blues (Interpretation open & doesn't have to be a card - the cheery colors, bling and gift are a "blues beater" for me)

Thanks for stopping by today.  


Friday, January 11, 2013

Thank You...for Loving Me - SNSDC87

This week's challenge for the Sweet 'n Sassy Digi Challenge Blog is perfect for cold winter days.  This week it's all about coffee, tea & hot chocolate images.  There's also lots of excitement on the blog as two new DT members are being announced and there will be an open DT call for the next two weeks.  Be sure to stop by the blog for all the details.


I chose to paper piece the adorable Cocoa's Latte.  I popped Cocoa's head up on dimensionals so that it looks like he's really peeking around the cup.  I added the Thank You sentiment from the Many Thanks sentiment set to the band on the cup.  I generated the "...for loving me" sentiment on the computer.  I used this week's Sweet Stop Sketch for the overall design.  I wrote "I luv u" on the brads with a marker.  Obviously, this card is for my hubby. :)  Shhhh....don't tell, I haven't given it to him yet.


Supplies:
Sweet Stop Sketch #192
Cardstock:  Georgia Pacific, Recollections, Bazzill
Patterned Paper:  Stampin' Up
Stamps:  Sweet 'n Sassy Digis (Many Thanks, Cocoa's Latte)
Ink:  SU Creamy Caramel
Embellishments/Tools:  Spellbinders (Deckled Rectangles Large & Small), Sharpie fine point marker (brown), Copics, pearls (Queen & Company), brads (MM), AC Slick Writer (black)

I'm entering this card in these challenges:
Word Art Wednesday #62 - Anything Goes
Terrifically Thrilling Thursday - Anything Goes

Don't forget to visit the Sweet 'n Sassy Digi Challenge Blog to read all the details on the DT call.  Thanks for stopping by to visit today.  You are appreciated!!

Friday, January 4, 2013

A Hundred Hearts.... - SNSDC86

It's time for the first challenge in 2013 for the Sweet 'n Sassy Digi Challenge Blog -- Something New.  It can be a new product, new technique, new card design, anything as long as it's new to the crafter.

For my card, I used a card design that I've never tried before....a Flip Down Stack Card.  It's this week's tutorial at SCS.  It was so much fun to make and the tutorial is fantastic!

Here is the card with the stack closed (I used a photo turn to hold my stack closed):


Here is the stack flipped down:


Here's a detail shot of the adorable Rhubarb holding a heart.


With the wonder of digi stamps I layered the "I love you" from the Valentine's Day Greetings Digital Stamp Set on Rhubarb's heart.  I used more of the sentiments in Valentine's Day Greetings and one from the Love Sentiments Digital Stamp Set on the flip down panels.


Supplies:
Cardstock:  Georgia Pacific, Bazzill, Copic
Patterned Paper:  Basic Grey (Bittersweet)
Stamps:  Sweet 'n Sassy Digis (Valentine's Day Greetings, Love Sentiments, Rhubarb's Heart)
Markers:  Copics (E01, 07, 31, 33, 35, R20, 81), Bic Mark-It (Desert Rose)
Tools/Embellishments:  Spellbinders (Classic Squares Large & Small), punches (SU Corner Rounder, EK Success Heart), ribbon (May Arts), Stickles (Star Dust), CM Fine Tip Black Pen, MM Photo Turn

I'm entering this card in the following challenges:
Word Art Wednesday #61 - Anything Goes
Terrifically Thrilling Thursday - Anything Goes
Spark Your Creativity Now Challenge #5 - Anything Goes


Thanks for stopping by today and I hope you'll join us in using Something New.

Tuesday, January 1, 2013

Happy New Year!!


Happy New Year!!  I hope this finds your year off to a good start and that 2013 will be a year of blessings for you.  2013 has some exciting things on the horizon for our family.  Our daughter is planning a wedding in May.  This means we'll be adding a son-in-law to the family.  Actually, he already feels like part of the family so their wedding will just make it official. 

A new year feels like a clean slate and a good time for fresh beginnings. I have a couple things that I'd like to accomplish in 2013 but the main thing is that I'd like to draw closer to the Lord this year.  There's nothing more important and if we find ourselves saying we're too busy to spend time with Him....well, then we're just too busy and we need to let something else go. 

Exciting News!!  


Today, I'm sharing a digi card with you.  It is my first project as an official member of the Daydream Designs Dream Team.  I was so excited when Diane asked me to join the team.  I really enjoyed my month as a Guest Designer and now I get to work with her fabulous designs all the time.  For my digi card I used the Happy New Year Paper Pack and the Happy New Year Color Digi Set.  I used PSE to assemble my card and made my own brads, banner & matting.

Happy New Year and may the Lord bless you and your family in this brand new year of 2013.


Monday, December 31, 2012

Happy Anniversary, Sweetheart!!

Last Friday, Dec. 28th, my husband and I celebrated our 28th anniversary.  The Lord graciously gave me a husband that is my best friend and is a godly leader for our home.  I have been blessed FAR beyond what I deserve. 


I wanted to make him an anniversary card, and when I saw this digi sentiment from Clear Dollar Stamps in their Unity Candle digi set, I knew I was on the right track. In PSE, I layered the sentiment over a picture of our actual unity candle (I lowered the opacity to 50%) and let that be the focal point of the card.  Some Spellbinders dies helped with the accents, and textured/embossed Bazzill cardstock and brads added  masculine touches.

Supplies:
Card base:  The Paper Company
Cardstock:  Recollections, Copic, Core'dinations, Bazzill
Patterned Paper:  Echo Park (Times & Seasons)
Stamps:  Clear Dollar Stamps (Unity Candle)
Ink:  Stampin' Up (Creamy Caramel)
Tools/Embellishments: brads (Paper Studio), Spellbinders (Deckled Rectangles Large & Small, Fancy Tags 3, Decorative Photo Corners), PSE7

And just because I'm feeling a bit nostalgic, here are a couple pics from our wedding day.


Thanks for stopping by today.  I hope you've enjoyed the Christmas season.

Wednesday, December 26, 2012

WAW #60 - Quick Bookmark

I hope each of you enjoyed your Christmas holiday and were able to spend time with those you love.  We were able to spend the day with our daughter and her fiance and were in contact with our son via text and phone call.  (He and his family came up a little over a week ago to celebrate with us since they couldn't be here on Christmas day.)

Today is my last post as a Guest Designer for Word Art Wednesday.  This has been a quick month!  I'd like to thank Karen for the honor of being asked to guest design for one of my favorite challenges.  She is fantastic to work with and she is one of the most encouraging people I have ever met!  What a blessing she is!


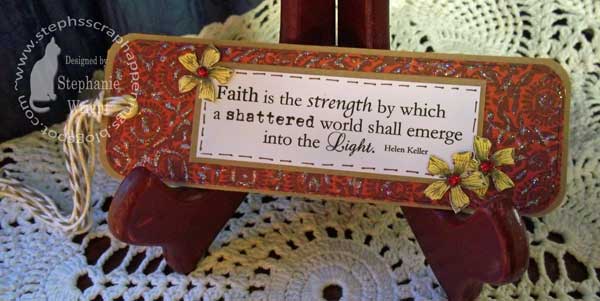
The focus sentiment this week is a quote by Helen Keller.  I chose to use it on a simple bookmark.  I printed the sentiment and matted it on kraft cardstock. I layered a piece of patterned paper on a kraft cardstock base.  The sentiment panel was layered on top and faux stitching was added to the sentiment and the patterned paper layers.  Three flowers were fussy cut from coordinating patterned paper and attached with glue dots.  I kept everything flat so that it would be functional.  The flower centers and the swirls in the background paper were accented with Stickles.  An eyelet and baker's twine finished off this easy-to-make bookmark.

Supplies:
Cardstock:  Express-it, Recollections
Patterned Paper:  Bo Bunny (Serenade Poppies)
Stamp:  Word Art Wednesday
Embellishments/Tools:  Round-it-All corner rounder, eyelet (American Crafts), baker's twine (The Twinery), Stickles (Christmas Red, Star Dust), Sharpie fine point marker (brown), Sakura Micron (black)

I'm entering this card in the following challenges:
Sentimental Sunday #134 - Focus on the Sentiment
Spark Your Creativity Now Challenge #4 - Anything Goes


Thanks for stopping by today.  I hope you'll play along with us this week.
Friday, December 21, 2012

Winter Wishes - SNSDC85

It's time for another Sweet 'n Sassy Stamps Digi Challenge and for some added excitement the design team is showcasing the 3 new digi releases today.  The challenge this week is super-easy...use your favorite colors.  To allow the design team time to be with their families, this challenge will run for 2 weeks.  

I was able to play with Bundled Autumn and the Winter Wishes Sentiments set.


When I think of cards that have snow on them, blue & white is my favorite combination.  When I make a card for a girl, I like to have pink.  So, for my card today, I used all three colors, blue, white & pink.  Of course, with snow and girls, you need lots of sparkle!  Stickles & bling were a must!!


Autumn was colored with Copics and her flower, eyes and coat toggles were highlighted with metallic pens.  Her eyes also got a white highlight dot from an opaque white pen.  Her coat pockets & the flower on her hat received some "stickles" attention.  Autumn was fussy-cut and popped up on dimensionals.  The snowflake is double-layered and the top layer also received stickles as well as a button & baker's twine.  The bling "wind" flourish adds more sparkle.

The sentiment was cut out with the smaller frame in the Spellbinders Polka Dot Frames set.  The sentiment is on the center cut out. I'll use the actual frame on another project.  The pink mat was hand-cut. The heart was colored with a copic marker and then red was toned down with a metallic pen.  Then some stickles were added for the last touch of sparkle. The Edgeabilities die adds some "snow" interest along the bottom of the card.

Supplies:
Cardstock:  Express-it, Georgia Pacific, Bazzill
Patterned Paper:  Bo Bunny (Snowfall)
Stamps:  Sweet 'n Sassy Digis (Bundled Autumn, Winter Wishes Sentiments)
Embellishments/Tools:  Copics (R20, 27, 81, 83, 85; B000, 21, 23, 26, 32; E 00, 01, 31, 33, 35, 37; YG03, Y11), Sakura {Micron-black pen, Gelly Roll Metallic Pens (pink, green, red)}, Spellbinders (Polka Dot Frame, Create-a-Flake 4, Classic Edges 2, Classic Decorative Inserts 5), button (stash), baker's twine (The Twinery - denim), Stickles (Star Dust), Uni-ball white opaque pen

I'm entering this card in the following challenges:
Word Art Wednesday #59 - Anything Goes
Paper Pretties Wednesday Challenge (PWC237) - Glitter
Shopping Our Stash #82 - Winter but NOT holiday
Terrifically Thrilling Thursday - Out with the old, in with the NEW (New to me (early Christmas gifts) are the snowflake dies, metallic pen set, this set of bling flourishes and of course Autumn & the sentiment are brand new digis)


 Come play along with us this week and show us your favorite colors.  I hope each of you will enjoy the Christmas holiday with those you love.  Let's never forget that Jesus truly IS the reason for the season.

Wednesday, December 19, 2012

WAW #59 - Christmas Door Sign

It's time for another Word Art Wednesday Challenge.  As always, these challenges are Anything Goes.  As long as your project is positive and uplifting, feel free to link up to 5 projects each week.  This week, our prize is sponsored by Daydream Designs.  Diane graciously provided digis stamps for us to use.  I chose to use the pre-colored Deck the Halls Digi Set.

The focus verse this week is Luke 2:14, "Glory to God in the highest, and on earth peace, goodwill toward men."  While we think of this as a "Christmas" verse, and it is, what a great reminder all year 'round that we should be giving God the glory and striving to live in peace with goodwill towards all men/women.  If you really think about it, that's enough to keep you busy 365 days a year!


My husband and I have an apartment on the first floor of the men's dorm on the college campus where he teaches.  Because there are also guest rooms on our floor, we keep a sign on our interior hall door with our names on it to let visitors know who lives here.  At my daughter-in-law's suggestion, I decided to make a special one for the Christmas season.  Our printer ink is running out, so I touched up some of the leaves & petals on the poinsettia with a little copic coloring.  The candle flame, wax "drip" and the poinsettia received some attention from various colors of Stickles.  An organdy bow finishes off the sign.  I kept it pretty simple since it has to hang on the door.  I added four magnets to the back to attach it to the metal door.

Supplies:
Cardstock:  Express-it, DCWV
Patterned paper:  DCWV (Heirloom Christmas)
Stamps:  Word Art Wednesday (scripture), Daydream Designs (Deck the Halls Digi Set - Color)
Embellishments/Tools:  Stickles (Star Dust, Yellow, Orange Peel), ribbon (Ribbon Trends), Copic Markers (R27, G07, G17), Spellbinders Grand Labels One

I'm entering this project in the following challenges:
Paper Pretties Monday Challenge (PPMC70) - Christmas
Really Reasonable Ribbon #62 - Anything Goes + Ribbon
 

As the Lord brings it to your mind, please be in prayer for the family and friends of Word Art Wednesday Design Team member, Paula Pike.  Yesterday, the Lord delivered Paula from her battle with cancer by taking her Home to be with Him.  While Paula is enjoying the glories of Heaven, she will be greatly missed by her husband, four children and many friends.

Thanks for stopping by and hug those you love just a little closer today.

Peace & Joy

It's time for my final project as the December Guest Designer for Mark's Finest Papers Sketch with a Twist Challenge.  My month with them has gone quickly and I've enjoyed using their beautiful stamps.  I'm a bit late posting this today as our internet went out last night.  I am really pleased with our internet company though because they had a service tech out here after work tonight and he fixed the line & replaced the modem.  Most companies don't have "after work hours" techs still working let alone give you same day service.   Anyway....back to the important stuff -- I'll try to keep it short & sweet to get this posted ASAP.

Here is this week's sketch....


This week's twist is to make a Christmas card.


My version includes some die cutting on the background mat and sentiment panel.  I hand cut the music sheet & one spray of pine cones & evergreens.  The spray was accented with some stickles.  There are a few pearls scattered about and two ribbons layered together.  The words on the sentiment panel were traced with a glitter pen for a little added sparkle.


I did a little interior decorating.  I kept it fairly simple and just layered a few die cuts.

Supplies:
Cardstock: Core'dinations (pearls - card base), Recollections (cream), DCWV (Christmas & Winter Cardstock stack)
Patterned Paper:  DCWV (Heirloom Christmas)
Stamps:  Mark's Finest Papers (Greetings of the Season Mini Stamp Set, Christmas Music Stamp Set )
Ink/Markers:  Memento (Rich Cocoa), Bic Mark-it Markers (Woodsy Brown, Honey Brown, Tiki Hut Tan, Forest Green, Key Lime), Sharpie Brown Fine Point Marker
Embellishments/Tools:  pearls (Paper Studio, SU), Stickles (Star Dust), Sakura Gelly Roll pen (Clear Star), ribbon (Ribbon Trends Organdy, American Crafts satin) Spellbinders (Classic Ovals Large, Floral Ovals, Classic Squares Large & Small, Lacey Squares, Classic Decorative Inserts 5, Classic Decorative Edges 2)

I'm entering this card in the following challenges:
Stamptacular Sunday #194  - Christmas Card 
Paper Pretties Monday Challenge (PPMC70) - Christmas
Really Reasonable Ribbon #62 - Anything Goes + Ribbon

Thanks so much for stopping by for a visit today.  I hope you'll play along in this week's challenge and use this versatile sketch to finish up those last minute Christmas cards.

Friday, December 14, 2012

SNSDC84 - Tag You're It!

This week's challenge at the Sweet 'n Sassy Digi Challenge Blog is to make a tag.  You can add the tag to a gift, have it be a to/from tag or even have a tag on a card. Your tag doesn't even have to be Christmas themed.  One of the DT chose to make a Valentine's Day card. The choice is your's as long as there's a tag.


I chose to keep things simple and made two to/from tags that can also be bookmarks after the holidays.  I went with some of my favorites on this project.  I used Rhubarb {he's such a cute teddy bear}, my new floral oval and classic oval dies and traditional red & green papers.


For one tag I used Rhubarb and his candy cane and the other Rhubarb and his stocking.  I colored Rhubarb and his candy cane/stocking with Copics.  I accented the bow on the candy cane with star dust stickles and the fur on the stocking with frosted lace stickles.  I also added some stickles to the holly on the stocking.


After coloring, I die cut both the image panel and patterned paper mat from classic oval nesties.  Then they were layered on top of the next to largest floral oval die cut.  A jute string provides the hang tie.  VERY simple.  I didn't add pearls or other bumpy embellishments so that they could be used as bookmarkers after they finish their jobs as package tags.

Supplies:
Cardstock:  Express-it, Bazzill
Patterned paper:  Echo Park (Season's Greetings)
Stamps:  Sweet 'n Sassy Digis (Rhubarb's Stocking, Rhubarb's Candy Cane)
Copics: Rhubarb's Candy Cane (E01, 09, 31, 33, 35, 37, N0, W1, G14, 17, R27), Rhubarb's Stocking (E01, 09, 31, 33, 35, 37, N0, W1, G17, R27)
Embellishments/Tools:  Spellbinders (Classic Ovals Small & Large, Floral Ovals), jute (JoAnn's), Stickles (Star Dust, Frosted Lace, Christmas Red, Green)

I'm entering these tags in the following challenges:
Stamptacular Sunday #193 - Anything But a Card
Catered Crop - Gift Tags
Paper Pretties Monday Challenge #69 (PPMC69) - Red, Green & your choice (I chose brown)
Word Art Wednesday #58 - anything goes
Terrifically Thrilling Thursday - Christmas is in the Air!
Crafty Ribbon Challenge #34 - Tag
Spark Your Creativity Now! Challenge #4 - Anything Goes
Sweet Stampin' - Dies & Punches

Thanks for stopping by today.  I hope you have a good weekend.

LinkWithin

Related Posts Plugin for WordPress, Blogger...